Let’s make an Image Classification App with higher accuracy without extension!
You can change the machine learning model easily, because this app does not use extension.

From the Project menu, select New Project and name it “WhatisThis2".
Why LookExtension extension is not needed?
With tensorflow.js, you can use machine learning models in a browser. The LookExtension extension developed at MIT uses tensorflow.js. However, it is not easy to change the model because the extension must be rebuilt to change the machine learning model. In addition, the model used in this extension is small in size, so the accuracy is not that good. To solve this problem, we have developed a method for image classification using machine learning models by simply using a web page that contains JavaScript to be used in the browser. This method uses an external website to load the image files on the web page, but the model can be easily modified by simply changing the JavaScript on the web page.
Design editing
Layout and component placement
As shown in the figure below, place a WebView, a TextBox from the User Interface palette, and a HorizontalArrangement layout from the Layout palette. Drag and drop two buttons from the User Interface palette and rename them as the PictureButton and the InferenceButton, and place them in the HorizontalArrangement1. and place them in the layout. As invisible components, drag and drop a Camera from the Media palette and a Clock from the Sensors palette, and two Webs from the Connectivity palette. Rename one Web component to “upload" and the other to “removefile". Rename the hint in TextBox 1 to “Result", the text in the PictureButton to “Take Picture", and the text in the InferenceButton to “Inference".

Adding a web page that contains JavaScript
Create the following html file and add it to your assets by clicking the “Upload File" button on the Media. The file name should be index.html. The following is a brief description of this file.
Line 3: Read tensowflow.js
Line 4: Read MobileNet
Line 10: Image tags for captured image files
Line 18-24: WebGL2 function
Line 27-30: setimage() function. Set the URL of the image file passed from the App Inventor app.
Line 33-44: classify() function. Make inferences and pass the results to the App Inventor app.
Line 47-62: app() function. Determine if WebGL2 is present and set backEnd appropriately, then load the MobileNet model.
<html>
<head>
<script src="https://cdn.jsdelivr.net/npm/@tensorflow/tfjs"></script>
<script src="https://cdn.jsdelivr.net/npm/@tensorflow-models/mobilenet"></script>
</head>
<body>
<div><input type="text" id="output" size="100" value=""></div>
<img id="img" crossorigin src="https://img.appinventor.tmsoftwareinc.com/images/tfjs.png" width="80%"/>
<script >
let net;
var supportsWebGL2 = ( function () {
try {
return !! window.WebGLRenderingContext && !! document.createElement( 'canvas' ).getContext( 'webgl2' );
} catch( e ) {
return false;
}
} )();
function setimage() {
var appInventorInput = window.AppInventor.getWebViewString();
document.getElementById('img').src = appInventorInput;
}
async function classify() {
window.AppInventor.setWebViewString('');
const imgEl = document.getElementById('img');
const result = await net.classify(imgEl);
const ret = result[0]['className'];
// document.getElementById("output").value = ret;
window.AppInventor.setWebViewString(ret);
}
async function app() {
if(supportsWebGL2){
document.getElementById("output").value = 'WebGL2 is supported';
}else{
document.getElementById("output").value = 'WebGL2 is not supported';
tf.setBackend('cpu');
}
document.getElementById("output").value = 'Loading MobileNet..';
// Read MobileNet
net = await mobilenet.load();
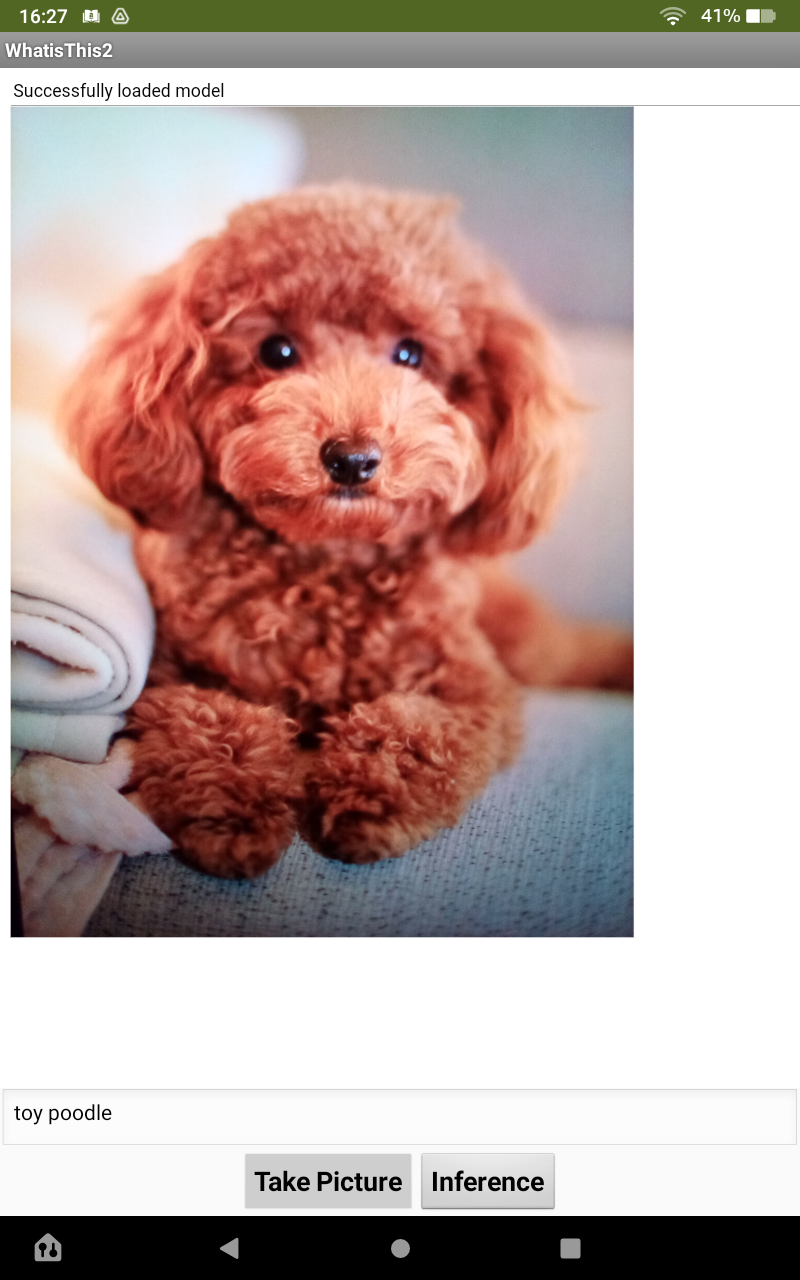
document.getElementById("output").value = 'Successfully loaded model';
}
app();
</script>
</body>
</html>Programming using the block editing function
Global Variables
The first step is to define the global variables. Click on the variable in the Built-in block and drag and drop the “Initialize global name to" blocks to set it as shown below. production is true when building apk file and false when using MIT AI2 Companion. imageHost is the webserver to upload the image files. waitTime is the time in milliseconds to wait to get the inference results. The other variables are temporary.

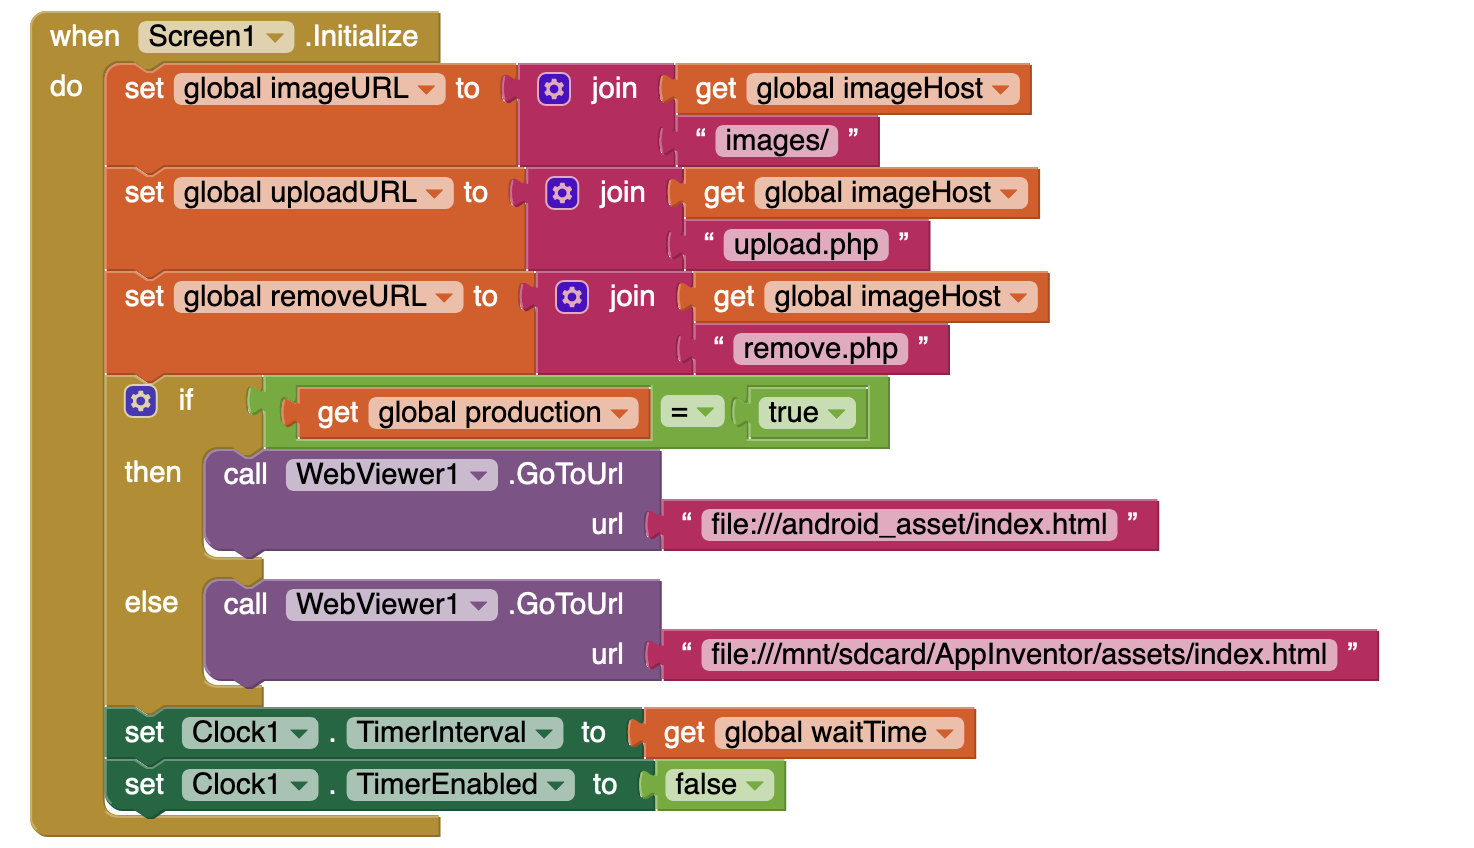
Screen Initialize event
Incorporate the following blocks into the “when Screen1 Initialize" block. The first three blocks set temporary global variables. They are, in order, the URL of the uploaded image file, the URL of the PHP script used to upload the image file, and the URL of the PHP script used to delete the image file. The next if block sets the URL of the WebViewer1 to a different path because the asset path is different when building the apk file and when running on MIT AI2 Companion. Finally, we set the wait time for the timer and disable the timer.
PictureButton click event
Incorporate a “TextBox1 Text" block with blank text, a “call Camera1 TakePictire" block, and a “InferenceButton Enabled" block with a false logic block into the “when PictureButton Click" block

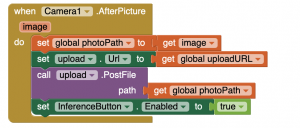
Camera1 AfterPicture event
In the “when Camera1 AfterPicture" block, set the global variable “photoPath" to the image taken by the Camera1, set the global variable “uploadURL" to the URL of the upload web, and call upload PostFile with the image to upload it. At the same time, activate the InferenceButton.
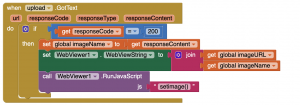
Upload GotText event
In the “When upload GotText" block, if the upload is successful, the name of the uploaded file will be returned in the responseContent, so set the global variable imageName to this file name. Then set the full URL of the image file to the WebViewString in WebView1 and call the setimage() JavaScipt function. This will display the uploaded image in the WebView1.
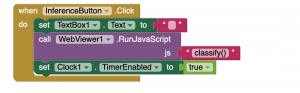
InferenceButton click event
In the “when InferenceButton Click" block, put the blank text in the “TextBox1 Text" block, and call the classify() JavaScipt function to perform the inference. At the same time, enable the timer.
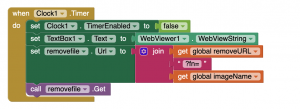
Timer event
It takes some time for the WebViewString of WebView1 to be returned after calling the classify() JavaScript function, so we use a timer to wait for a while. This time is set in the global variable waitTime, which is 500 milliseconds (0.5 seconds). In the “when Clock1 Timer" block, disable Clock1, display the WebViewString of WebView1 in the TextBox1 Text, set removeURL with imageName to the URL of the removefile web, and then call the removefile Get method to delete the file from the webserver.
Download source
Source code of this App is available at MIT App Inventor GalleryPHP source codes
They are the PHP source codes used to upload and delete image files. You can refer to it when using your own web server. For browser security, web servers need to return Access-Control-Allow-Origin “*" in the Header. For Apache web server, set Header set Access-Control-Allow-Origin “*".
upload.php
<?php
$data = file_get_contents('php://input');
$tmpfname = tempnam("/var/www/------/images", "prefix");
if (!(file_put_contents($tmpfname,$data) === FALSE)) echo basename($tmpfname); // file could be empty
else echo "File xfer failed.";
?>
remove.php
<?php
if(isset($_GET['fn'])) {
    $fname = "/var/www/------/images/" . $_GET['fn'];;
    if(file_exists($fname)) {
        echo "unlinked $fname";
        unlink($fname);
    }
}
?>